
How to Make a Beam: Gimp (any version)
4 posters
Bearville Guide Forum :: Bearville Guide Exclusives :: Join a club! :: Arts :: BGF Graphic Design Club
Page 1 of 1

How to Make a Beam: Gimp (any version)
![]() by Bear Mon Feb 07, 2011 5:47 am
by Bear Mon Feb 07, 2011 5:47 am

This tutorial will teach you how to make a beam on Gimp, for any program since it basically has the same features. I've decided to make a separate tutorial for Gimp for beams.
1. Open a photo onto Gimp. If you have it saved already, go to File>Open then get your photo. If it's copied from the Internet, and you need to paste it, go to File>Create>From Clipboard then paste it onto your clipboard.
Here is my image, feel free to use it as an example:

2. Make a new layer! (by typing on your keyboard, CTRL+Shift+N or Layer>New Layer. At the layer file type option, choose "transparent".
3. Make sure your settings are like mine in the picture below. Choose whatever colour you want the beam to be beforehand.

Now, select your "Paths" tool (looks like this:
 ) and make curved lines around your object. Click HERE if you don't know how to make curved lines, there is a very detailed and informative tutorial there.
4. Once you're done making the beam with the path tool, it should look like this (you can do the curves etc however you want, be creative!):

5. Now it's time to stroke our path. Click the "Stroke Path" button in your toolbox.

6. Now you will get a popup for the Stroke Path options. You either choose both options. If you want to the beam to be thicker & more visible at middle of the beam and thinner & fading at the ends, I recommend stroking it with the paintbrush option. If you don't want that, then I just recommend "Stroke Line", also if you want to choose how thick/thin the whole beam will be.

For the paintbrush option, your beam will be as thick as what your brush for the paintbrush is at the moment. If you want to change paintbrush thickness before you're about to stroke the path, (make sure you have your paths window up by going to Window>Dockable Docks>Paths. Now after that go to your paintbrush, choose thickness of brush, then go back to your pen tool. Through all of this, if your beam disappears just go to the paths window and click to the left of the path tool layer, the eye so it shows.
Now, it might not let you "Stroke Path" once you're at the pen tool so click where your path is to select it on the canvas then choose options... tah-dah!

7. Then click Stroke at the bottom of your popup once you've chosen your options. If you chose stroke line it will look like this (yours may be thinner/thicker than mine depending on settings you chose):

If you chose Stroke w/ Paint tool it should look like this (yours may bethinner/thicker depending on settings you choose). Mine is EMULATED BRUSH DYNAMICS to show you what it looks like. (you may want to drag the ends of your path for this out more so its more visible at the ends):

8. Go back to your paths window, and right click the path you have, then click "Delete Path".

And after that, once you've decorated the beam etc, and you can use the lasso or eraser tool to delete beams you don't want, you can alternate etc, you're finished. I will show you my finished product later, but right now my tinypic started to stop working

Bear- Officer
Re: How to Make a Beam: Gimp (any version)
![]() by emmie Sat Mar 26, 2011 6:07 am
by emmie Sat Mar 26, 2011 6:07 am
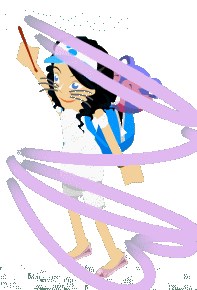
here is mine! i did mine a little differently i added a glow to it 


emmie- Guide Bear

Re: How to Make a Beam: Gimp (any version)
![]() by Bear Sat Mar 26, 2011 6:49 am
by Bear Sat Mar 26, 2011 6:49 am
They both look really good! And I love the creativity.

Bear- Officer
Re: How to Make a Beam: Gimp (any version)
![]() by emmie Sat Mar 26, 2011 7:09 am
by emmie Sat Mar 26, 2011 7:09 am
thanks! and if you want the glowing part; just go to filters> neon right after you add the beam and then you can selet the glowing colors and then you delete the layer you had and then viola!
and then you delete the layer you had and then viola!
emmie- Guide Bear
Re: How to Make a Beam: Gimp (any version)
![]() by Bear Sat Mar 26, 2011 7:30 am
by Bear Sat Mar 26, 2011 7:30 am
lollipops511 wrote:thanks! and if you want the glowing part; just go to filters> neon right after you add the beam and then you can selet the glowing colors
That's a good tip! Maybe I'll make another tutorial on techniques you can stylize beams, or you can if you want
Bear- Officer
Re: How to Make a Beam: Gimp (any version)
![]() by emmie Sat Mar 26, 2011 7:48 am
by emmie Sat Mar 26, 2011 7:48 am
Bear wrote:lollipops511 wrote:thanks! and if you want the glowing part; just go to filters> neon right after you add the beam and then you can selet the glowing colors
That's a good tip! Maybe I'll make another tutorial on techniques you can stylize beams, or you can if you want
thanks! and yes i would love to!!
and yes i'll try to add a tutorial as soon as i find time!
emmie- Guide Bear
Re: How to Make a Beam: Gimp (any version)
![]() by AlexaAngel180 Sat Mar 26, 2011 11:57 pm
by AlexaAngel180 Sat Mar 26, 2011 11:57 pm
great guide bear!

AlexaAngel180- Novice Bear

Re: How to Make a Beam: Gimp (any version)
![]() by Bear Sun Mar 27, 2011 6:27 am
by Bear Sun Mar 27, 2011 6:27 am
AlexaAngel180 wrote:great guide bear!
Thank you! However, you are not a member of BGF Graphic Design Club.
Feel free to join
http://www.bearvilleguide.com/t55012-apply-here-to-be-a-member-of-bgf-graphics-design-club
Bear- Officer
Re: How to Make a Beam: Gimp (any version)
![]() by Anita Sun Sep 04, 2011 1:45 am
by Anita Sun Sep 04, 2011 1:45 am
It was my first graphic with gimp, thanks so much for helping! [:

Anita- BABV Events Planner
» How to Make a Beam: Photoshop (any version)
» How to make a dotted line animation- GIMP
» How to Stroke around Objects: Gimp (any version)
» How to do a bokeh affect on Gimp(any version)
» How to apply Drop Shadow to your Images: Gimp (any version)
» How to make a dotted line animation- GIMP
» How to Stroke around Objects: Gimp (any version)
» How to do a bokeh affect on Gimp(any version)
» How to apply Drop Shadow to your Images: Gimp (any version)
Bearville Guide Forum :: Bearville Guide Exclusives :: Join a club! :: Arts :: BGF Graphic Design Club
Page 1 of 1
Permissions in this forum:
You cannot reply to topics in this forum|
|
|